
Do you love meat?
Then you must have surely bought an electric smoker for smoking various vegetables and different types of meats for an evening dinner with friends and family members.
Are you aware of the process of curing & seasoning an electric smoker? Whenever you buy a new electric smoker, you have to know how to season an electric smoker to prepare it properly.

The popularity of electric smokers is increasing each day, especially among the younger generation. Seasoning an electric smoker for the first time is a very important step whenever you buy a new one because during the production, the manufacturers do not pay much attention to its seasoning and, therefore, it is the duty of the customer to season it.
Reasons For Seasoning An Electric Smoker:
1. To Burn off left over chemicals and dirt
Residual substances are likely to be petroleum based, or they may contain some left over solvents. I doubt you want these hanging around in your cooker when it comes to preparing food. Not only are they potentially hazardous, but they also will make your food smell and taste bad.
2. To Cure the Paint and Protect From Rust
Seasoning an electric smoker will also cure any paints or coatings on the inside your cooker. it will also help prevent rust from developing as your smoker ages.
3. To Add a Thin Layer of Black Smoke
During the last steps of seasoning an electric smoker, you will burn some wood chips and this adds a thin layer of black smoke to the inside of your smoker. Over time this black coating will build up and the flavor should only get better!
4. To Familiarize Yourself With Your New Smoker
As with any new tool or toy, you want to know as much as possible about how it works and why. An electric smoker is no different. Each make and model will handle temperatures differently. So the more you know, the better your food will taste!
Is It Necessary To Season an Electric Smoker?
Short answer: YES. When manufacturing electric smokers, manufacturers do not always clean them very well and the bulk production process may often leave them dust, dirt and other possible chemicals.
There are some toxic substances and/or industrial oils left in the inner chamber which need to be removed. Otherwise, they will adversely affect your health. It also will not provide proper flavors your the food if it is not cured or cleaned it in an effective manner.
Get Ready To Season The Electric Smoker
It is essential to select a superior quality smoker for best results. But I am guessing that you have already chosen yours.
1. Unpackage the Electric Smoker
Now, the first step is to remove your newly bought electric smoker from the packaging and choose an open space such as your backyard or garage for the seasoning process. You want an area with lots of ventilation.
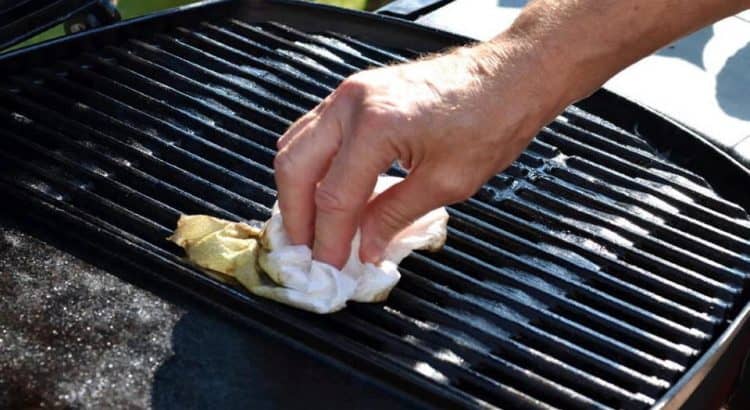
2. Wipe Down the Interior
Make sure the smoker is not plugged in yet as you will gently wipe down the interior, grates, and trays with a damp sponge and some soapy detergent. This will begin to remove dust.
Make sure to not scratch any of the surfaces.
3. Allow It To Air Dry and Coat with Oil

Let your electric smoker air dry and once it is all dried out, you need to place a light coating of cooking oil on the surfaces. You can do this by using a cooking spray or by dipping a paper towel in some corn or olive oil and wipe it over the surfaces.
The surfaces don’t need to be dripping but rather a thin coat will suffice. There is no need to coat the chip tray, heating element, grease tray, nor the water tray with oil.
Next, put all the trays and grates back into their proper position.
4. Open the Top Vent and Turn On
Now, open the top vent all the way open.
Plug in your smoker and switch it on. There is usually a power switch or button which you have to hold and press one time. However, different models have different starting methods.
After turning on the power button, let the electric smoker start working.
5. Heat The Smoker
The next step to seasoning an electric smoker is to keep the temperature to as close as possible to 275F degrees for about 3 hours. Some smokers will have a different high but for those just set it to the highest temp.
This process may produce a bit of smell but that is because it is removing or burning off all the harmful substances and oils. Preheating the electric smoker will also remove the bad smell which can spoil your meat.
6. Adding Woodchips

When you are preheating the smoker, keep the temperature to 275 degrees which will eliminate all the harmful particles from the inner chamber.
After 2 hours or preheating, you will start by adding 8-10 wood chips to the wood chip loader. These wood chips will help clean and properly season the electric smoker and make it fit for preparing the meat and vegetables.
After about 20 minutes, add another 8-10 wood chips. You should see some ashes building up in the tray. That is a good thing and will help produce smoke that will better season it.
After yet another 20 minutes, add another load of 8-10 wood chips and make sure to not overload it.
7. Cool Down
Now just let the wood chips do their work and after 3 hours or so, you can turn off your smoker, unplug it, and let it cool down.
8. Ready for Next Use
Now that your smoker has cooled down, you can give a quick wipe down, cover it and store in a good spot for the next use.
The best place to store any electric smoker is going to be somewhere that offers a consistent temperature. The temperature can go up and down but keep the smoker out of direct sunlight.
It should also be free from getting wet. Water is going to lead to rust which will destroy the longevity of your smoker and make any food you cook have a bit of a dusty or metallic taste.
Tips for Your First Smoking
- For the first smoking after seasoning, I start with cheaper cuts of meat that are not so difficult to smoke. Pork butt, or a whole roaster chicken are all good options for your first smoke.
- Your first few smokes will always be a learning curve. Fortunately, electric smokers are very forgiving and you can always try again.
- If you have also purchased a cold smoking attachment, you could try smoking cheese for your first time. Cheese is also quick to smoke, relatively inexpensive, and delicious!
- Keep the moisture level in mind. Many electric smokers have a water pan. Make sure to keep some moisture in it so that your meat doesn’t turn our too dry.
Kinds Of Wood Chips

Generally, most consumers choose either Mesquite or Maple wood chips in the process of seasoning an electric smoker.
However, there are many other types that produce wonderful smells and tastes. Make sure to experiment with Hickory, Apple, Oak, Pecan, Plum, Alder, and even Cherry wood chips. You will be glad you did.
My personal favorite is cherry!
| Wood Chip Type | Flavor Profile | Best Suited For |
| Walnut wood chips | heavy, smoky, nutty | Red meat, wild game |
| Oakwood chips | dense wood, long, slow burning | Red meat, pork, fish |
| Hickory wood chips | bold, robust flavor | All meats, especially ribs and pork |
| Cherry wood | Mild, fruity, smoked flavor | Beef, Pork, Salmon |
| Applewood chips | Sweet, strong, dense flavor | Beef, Poultry, Fish |
| Mesquite wood chips | Earthy, bold, can be mixed with other wood chips | All meats, especially beef |
| Pecan wood chips | Nutty, earthy, mild flavor | All meats |
| Alder wood chips | Light and sweet, can be mixed with other flavors | Fish, Poultry |
| Maple Wood chips | Sweet, mild, mixes well with other flavors | Pork, Small game, Steak, Cheese, Vegetables |
| Plum wood chips | Mild, sweet, smoky,, can be mixed with other flavors | Most meats, Fish |
The Final Words on Seasoning an Electric Smoker
Unwrapping your new electric smoker and firing it up for the first time is an exciting experience. You are likely brimming with ideas about what you want to smoke and are already tasting that delicious meat.
Properly seasoning your electric smoker is not time consuming or complicated but it will help keep your smoker in top working condition, produce high quality and tasty meats and vegetables.
Now get out there and be King of the Smoke!


[…] Cleaning and seasoning an electric smoker is the first thing to do for healthy cooking. Make sure you always clean the smoker after each use. Take out all the racks, bowls and clean them properly. The important thing is – emptying the smoker and then start your cleaning It is an ideal practice because you can make sure everything is neat and clean in your system. If you do not clean the smoker after each use, it will keep on collecting the small residue from the smoke which will, later on, cause you more efforts to wash off. […]